 Pin it
 The first time I attempted a lattice tart, I was standing in my kitchen on a crisp October afternoon, surrounded by apple peels and an absurd amount of parchment paper. My friend had just mentioned wanting something elegant for her dinner party, and I remembered this beautiful dessert my grandmother used to make—apples woven like delicate ribbons over a walnut base. I'd never actually made one before, but the image stuck with me: those thin, glistening strips catching the light, the honey sweetness underneath. That afternoon, I learned that patience with the apple slices and a little kitchen bravery could create something that looked far more complicated than it actually was.
I made this for a potluck last November, and the tart traveled better than I expected—it held together beautifully, and watching people carefully lift those apple ribbons onto their plates felt like watching them unwrap a gift. Someone's kid said it looked like 'apple art,' which honestly made my entire evening. That's when I realized this wasn't just a dessert; it was an experience wrapped in pastry.
Ingredients
- All-purpose flour (1 1/4 cups): The foundation of your crust—keep it cold and handle it gently, as overworking the dough will make your tart tough instead of tender.
- Unsalted butter, cold and cubed (1/2 cup): Cold butter is non-negotiable here; it creates those flaky layers that make people close their eyes when they bite in.
- Granulated sugar (2 tbsp for crust, 2 tbsp for apples): The first bit sweetens the crust itself, while the second brings out the apples' natural sugars and deepens their color as they bake.
- Salt (1/4 tsp for crust, 1/8 tsp for filling): A pinch goes a long way—it balances sweetness and makes every flavor feel more itself.
- Ice water (3-4 tbsp): Add this slowly and only as much as you need; damp dough is forgiving, but soggy dough is your enemy.
- Walnuts, chopped (1 cup): Toast them lightly first if you have time—it deepens their flavor and makes them taste less like an afterthought and more like the star.
- Honey (1/4 cup): This isn't just sweetness; it's the glue that holds the walnut layer together and adds a subtle floral note that sets this apart.
- Light brown sugar (2 tbsp): Brown sugar adds moisture and a gentle molasses depth that white sugar can't match.
- Ground cinnamon (1/2 tsp for filling, 1/2 tsp for apples): This spice is the invisible thread connecting every layer—don't skip it, and don't be shy.
- Firm, sweet-tart apples like Honeycrisp or Granny Smith (3 large): The variety matters more than you'd think; waxy apples hold their shape during baking, while mealy ones collapse into applesauce.
- Lemon juice (1 tbsp): This prevents browning and adds a subtle brightness that makes the apple flavor pop instead of fade.
Tired of Takeout? 🥡
Get 10 meals you can make faster than delivery arrives. Seriously.
One email. No spam. Unsubscribe anytime.
Instructions
- Build Your Foundation:
- Preheat your oven to 375°F and grease your tart pan until it gleams—you want that crust to release cleanly when it's done. In a mixing bowl, whisk together flour, sugar, and salt, then scatter your cold butter pieces on top like you're planting seeds.
- Create the Crust Texture:
- Using your fingertips or a pastry cutter, work that cold butter into the flour until the mixture looks like coarse breadcrumbs—you want to see tiny butter pieces, not a smooth dough. Drizzle ice water over the top, one tablespoon at a time, tossing gently until the dough just barely comes together, then press it firmly into your tart pan, making sure it reaches evenly up the sides and across the bottom.
- Pre-bake the Crust:
- Prick the bottom with a fork (this prevents puffing), line it with parchment, fill it with baking weights or dried beans, and bake for 12 minutes until the edges turn light golden. Remove the weights carefully—they'll be hot—then give it another 5 minutes without them so the bottom sets.
- Spread the Walnut Layer:
- While the crust cools, combine your walnuts, honey, brown sugar, cinnamon, and salt in a bowl, stirring until everything is evenly coated and glossy. Spread this mixture across the cooled crust in an even layer, pressing it gently so it stays put during baking.
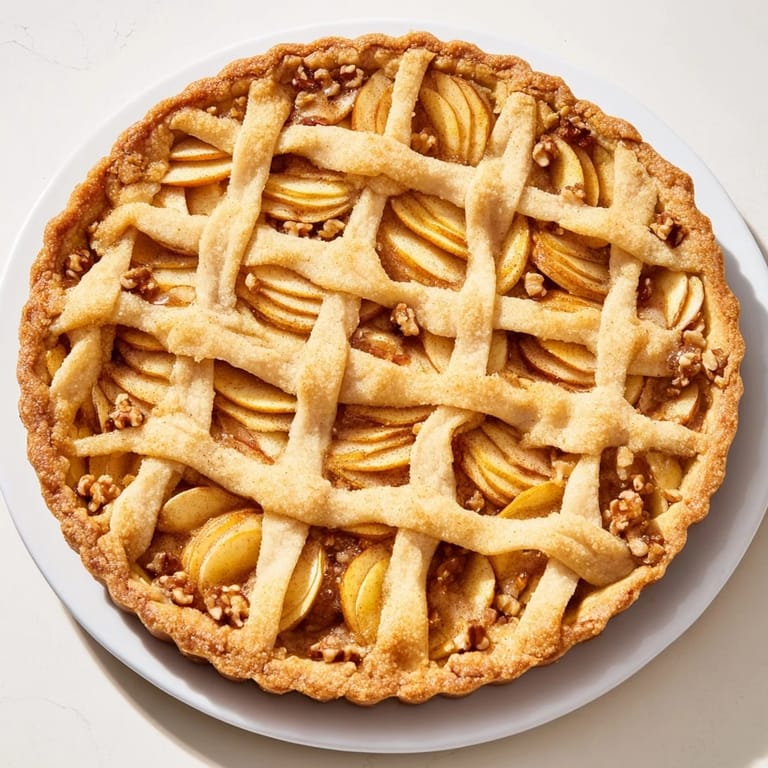
- Slice the Apples Paper-Thin:
- This is where a mandoline shines, but a sharp knife works too—aim for slices about 1/8 inch thick, almost translucent. As you slice, toss each batch with lemon juice so they don't brown while you work, then finish with sugar and cinnamon.
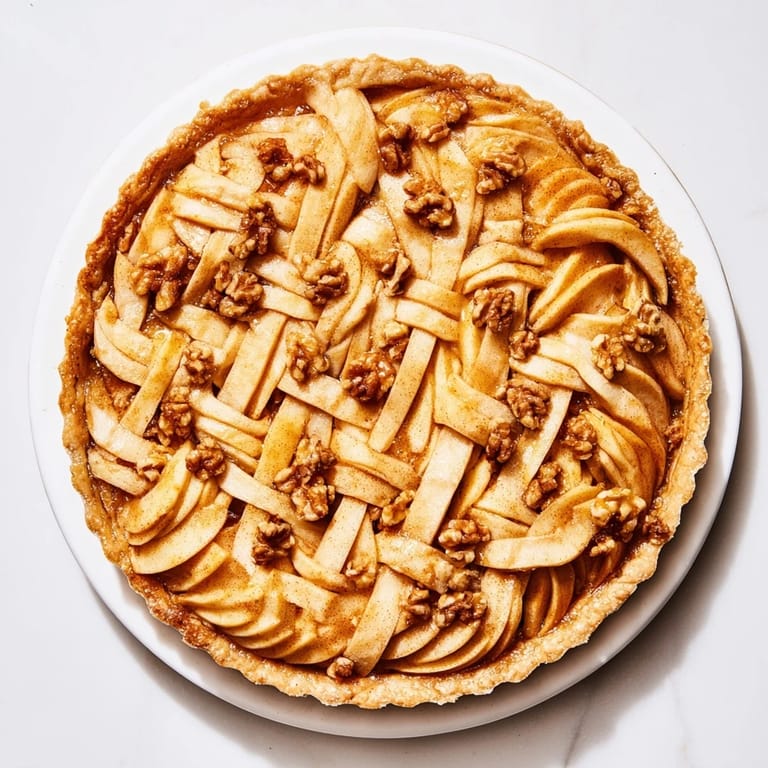
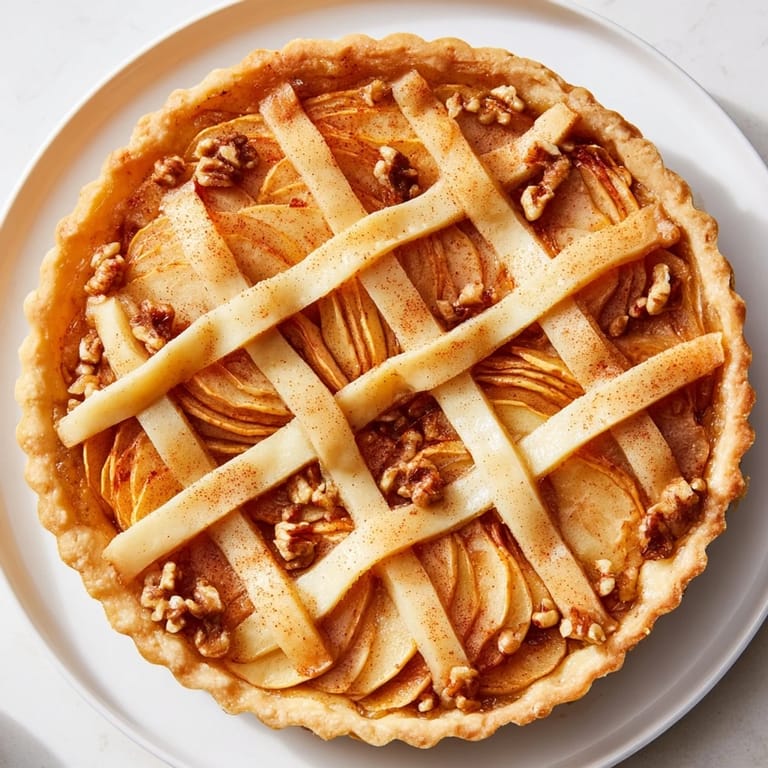
- Weave Your Lattice:
- Lay out half your apple slices in parallel rows on parchment, slightly overlapping them like roof shingles. Now comes the meditative part: weave the remaining slices over and under in the opposite direction, creating that beautiful diamond pattern. Once it looks right, carefully transfer the entire lattice onto your tart by lifting the parchment and gently sliding it into place.
- Bake Until Golden:
- Cover the tart loosely with foil and bake for 20 minutes, then remove the foil and bake another 10 to 15 minutes until the apple edges turn golden and you can smell the honey and cinnamon dancing together. The apples should feel tender when pierced with a knife, but not mushy.
- Rest and Serve:
- Let it cool for at least 20 minutes before slicing—this gives the layers time to set so your lattice stays intact and your first slice looks like it belongs in a magazine. Serve it warm with vanilla ice cream, or at room temperature with a drizzle of extra honey.
 Pin it
 The moment that made this recipe mine was when my ten-year-old nephew asked if he could help weave the lattice, and suddenly we were both standing at the counter, our hands working together over warm apples, laughing when a slice slipped sideways. He announced it was 'the best thing he'd ever made,' and I realized that recipes like this aren't just about feeding people—they're about giving them a memory they'll carry forward.
The Magic of Apple Varieties
Not all apples are created equal, especially when they're this visible in a dish. I learned this the hard way when I tried making the lattice with soft Galas that turned into applesauce halfway through baking. Honeycrisp and Granny Smith hold their shape beautifully—they're firm enough to slice thin without falling apart, and they have that necessary sweet-tart balance that keeps each bite interesting. If you can't find either, look for Pink Lady or Braeburn; the key is an apple that's slightly dense and has natural acidity.
The Walnut Layer's Hidden Depth
This walnut and honey base is easier than it looks, but it's also the secret weapon of the entire tart. The honey acts as a binder, holding everything together while adding a subtle floral sweetness that elevates this from 'basic apple tart' to something more refined. I once tried skipping this layer entirely to save time, and the result was forgettable—just apples and crust with no story between them. That layer is the conversation starter; don't skip it.
Variations and Personal Touches
Once you understand how this tart works, it becomes a canvas for your own ideas. I've made it with pecans when walnuts weren't on hand, swapped in a hint of cardamom, and even added a thin layer of almond paste under the walnuts for richness. The structure stays the same, but the flavors shift with what you have and what you're craving.
- Brush the finished lattice with warmed apricot jam for a glossy, jewel-like finish that looks restaurant-quality.
- A touch of vanilla extract in the walnut filling adds warmth without announcing itself.
- Serve alongside vanilla ice cream, whipped cream, or even a dollop of crème fraîche for brightness.
 Pin it
 This tart is proof that beautiful food doesn't have to be complicated—it just has to be made with intention and a little patience. Once you've woven that first lattice, you'll understand why people love it so much.
Recipe Q&A
- → What type of apples are best for the lattice?
Firm, sweet-tart varieties like Honeycrisp or Granny Smith hold their shape well and provide a balanced flavor.
- → Can I substitute walnuts with other nuts?
Pecans are a great alternative for a different flavor profile while maintaining similar texture.
- → How is the lattice formed with the apple slices?
Thin apple slices are laid in parallel rows then woven over and under each other to create the lattice pattern.
- → Is it necessary to blind bake the crust?
Blind baking ensures a crisp crust that won’t become soggy once the filling is added.
- → How can I make the lattice shiny after baking?
Brushing the baked lattice with warmed apricot jam adds a glossy finish and subtle sweetness.
- → Can this be made gluten-free?
Using a gluten-free flour blend in the crust provides a suitable gluten-free version without compromising texture.